Selecting seeds, soil and containers
Planting and caring for your seedlings
Troubleshooting
Resources
When mail-order catalogs and local garden centers are bursting with an astonishing variety of plants of all kinds, why would anyone want to bother starting their own plants from seed? Because starting plants from seed is less expensive; there are more varieties to choose from; you can grow higher-quality plants suited to your schedule; and you will enjoy the simple satisfaction of growing your own seedlings.
To be successful, you'll need to provide the right conditions for good germination and healthy growth. Here are the basics:
Easy Seeds for Beginners
Tomato
Marigold
Zinnia
Sunflower
Coleus
Basil
Nasturtium
Cosmos
|
If you are a beginning seed starter, start with "easy seeds" that are quick to germinate and don't require a lot of extra fussing. (See
Easy Seeds for Beginners.) It's easy to get carried away and buy too many different seed packets If you are starting seeds for the first time, you may want to limit yourself to no more than ten different types of seedlings.
Choosing the Right Containers
You can start your seeds in almost any type of container as long as it is at least 2 to 3 inches deep and has some drainage holes. There are many different seedstarting containers on the market, including peat flats, jiffy pellets and flats with individual growing cells. For tomatoes and peppers, you may want to start your plants in small containers and then "pot up" to larger containers. Some gardeners always plant their seeds in little rows in a larger flat. Once they're up, the tiny seedlings get separated and replanted into individual containers.
The Best Growing Medium
To provide the optimum growing conditions, and to avoid disease and insect problems, seeds should be started in a soilless growing mix, not in garden soil. A good soilless mix is a moist and spongy blend of sphagnum moss, vermiculite and perlite. The finer the texture the better.
What is in a Soilless Growing Medium?
Sphagnum moss is a dehydrated bog plant that is able to absorb 10 to 20 times its weight in water. It is used to retain water and provide texture. Look for moss that has been "milled" to remove debris and achieve a fine consistency. Sphagnum moss is naturally acidic (pH 3.5), so if you are creating your own soil blend, you should add some limestone to counteract the acidity. Sphagnum moss also has some fungus-inhibiting properties.
Vermiculite is mica rock that has been heated until it expands into what look like tiny multi-paged books. It is used to retain water and provide texture for strong root growth. Vermiculite is pH neutral, sterile and insoluble. It contains some magnesium and potassium, and also has a high cation exchange capacity, which means it is able to absorb fertilizers and release them to plant roots when needed.
Perlite is made from crushed lava that has been heated until the particles "pop" into white, sponge-like kernels. It is used to retain water and provide good aeration. Perlite is sterile and pH neutral. It holds three to four times its weight in water.
Coarse builder's sand is the best type of sand to use in a growing mix. Do not use beach or riverbed sand. The purpose of sand is to add texture, provide aeration, and improve drainage.
|
You can purchase a ready-mixed blend, or mix your own, using 1/3 vermiculite, 1/3 perlite, 1/3 milled sphagnum moss. Remember that soilless mixes contain few, if any, nutrients. You will need to start feeding your seedlings with a weak fertilizer solution as soon as they germinate, and continue to feed them weekly until you transplant them into the garden.
Once your seedlings are up and growing, you can transplant them into a coarser growing medium that contains some garden soil or sifted compost. A standard blend may contain 1/3 compost, 1/3 perlite or vermiculite, and 1/3 sphagnum moss. This will help ensure that your plants have access to some soil nutrients, and it will also help prepare them for life in the garden.
After your seedlings are several weeks old, and you are transplanting them into larger containers, you can add compost or garden soil to your soilless blend. This will provide some beneficial nutrients, and will help your seedlings get used to the bacteria and other microorganisms they will soon experience in the garden.
Timing Your Planting
Seeds sprout and plants grow at different rates, so timing is very important. Some seeds, such as celery and leeks, need to be started 12 weeks before they are transplanted into the garden. Others, including cucumbers and sunflowers, need only three or four weeks (and will suffer if started too early). Check the back of the seed packet to find the recommended seedstarting times. If you plan to start more than a packet or two of seeds, it helps to chart out a weekly seedstarting schedule, counting back from the date you plan to set out the transplants.
If you will be growing your seedlings in a greenhouse or a very warm room, you should subtract at least a week from the recommended planting date. Heat promotes faster growth, and you may find yourself with giant plants that are ready to be put out into the garden before warm weather arrives.
Seedlings that are started very early may need to be transplanted into larger containers after three or four weeks. This is especially true if you broadcast your seeds in flats rather than planting them in individual growing cells. The sooner your plants are put into individual cells with plenty of root space, the happier they will be.
For more on how to create a customized seedstarting schedule, see When to Start Your Seeds.
Planting and caring for your seedlings
The growing medium should be thoroughly moistened before it is placed in your seedstarting containers (warm water works best). Fill the flats or containers to within 1/4 to 1/2 inch of the top. You are now ready to sow your seeds. But before you do so, take another look at the seed packet for any special information about pre-chilling, pre-soaking, a preference for light or darkness, or special temperature requirements.
Seeds can either be scattered on the soil surface or placed individually into each growing cell. Resist the temptation to sow too thickly. Most seeds should be covered with a fine layer of soil. Unless the seeds require light to germinate (such as snapdragons), or are too tiny to tolerate being covered (such as petunias), you should cover the seeds to about three times their thickness.
Gently moisten the growing medium (using a mister or with dribbles of water) to ensure good contact between the seeds and the soil. Label each flat, row, or container with a wood or plastic marker so you can identify them later. Save the seed packet for reference.
Temperature
The temperatures for optimum germination listed on seed packets refer to soil temperature, not air temperature. Though some seeds germinate best at a soil temperature of 60 degrees F, and some at 85 degrees, most prefer a temperature of about 78.
Ideal Temperatures for Germination
Shown below are the ideal temperatures for germination of many of the most common seeds. Temperatures are in degrees F.
Asparagus, 75
Beans (lima), 85
Beans (snap), 80
Beets, 85
Cabbage, 85
Carrots, 80
Cauliflower, 80
Celery, 70
Corn, 95
Cucumbers, 95
Eggplant, 85
Lettuce, 75
Muskmelon, 90
Okra, 95
Onions, 75
Parsley, 75
Parsnip, 65
Peas, 75
Peppers, 85
Pumpkins, 95
Radish, 85
Swiss Chard, 85
Spinach, 70
Squash, 95
Tomatoes, 85
Turnips, 85
Watermelon, 95
|
If the soil is too cold, seeds may take much longer to germinate, or they may not germinate at all. To provide additional warmth, you can place the containers on top of a warm refrigerator, television, or
heat mat,

or keep them in a warm room until the seeds germinate. Just be sure to get your seedlings to a sunny window or under lights as soon as you see little sprouts emerging through the soil surface.
After germination, most seedlings grow best if the air temperature is below 70 degrees F. If temperatures are too warm (over 75), the seedlings will grow too fast and get weak and leggy. Most seedlings grow fine in air temperatures as low as 50 degrees, as long as soil temperature is maintained at about 65 to 70. You can keep the soil warm by using a heat mat, and can monitor the temperature with a soil thermometer.
Light
Most seeds don't require light to germinate, but as soon as they sprout, they need to be placed in a south-facing window or under lights. Check your seeds daily. Seeds that germinate and start to grow without adequate light will become tall and leggy -- a condition that is almost impossible to correct.
Most seedlings require 12 to 14 hours of direct light to manufacture enough food for healthy stems and leaves. The characteristic legginess that often occurs when seedlings are grown on a windowsill indicates that the plants are not receiving enough light intensity, or enough hours of light. If your seedlings are in a south-facing window, you can enhance the incoming light by covering a piece of cardboard with aluminum foil and placing it in back of the seedlings. The light will bounce off the foil and back onto the seedlings.
If you do not have a south-facing window, you will need to use artificial lights. When growing seedlings under lights, you can use a combination of cool and warm fluorescents, or full-spectrum fluorescent bulbs. The familiar incandescent bulb that lights our homes produces too much heat in relation to the light given off. It also lacks the blue-spectrum light that keeps seedlings stocky and dark green.
Seedlings need a high intensity of light. The bulbs should be placed very close to the plants -- no more than three inches away from the foliage -- and should be left on for 12 to 14 hours per day. If you are growing your seedlings on a windowsill, you may need to supplement with a few hours of artificial light, especially during the winter months.
Moisture
Germination requires consistent moisture. It is important that the soil be kept moist but not soggy to prevent the seeds from rotting. There are different ways to achieve this. Some gardeners cover their flats with clear plastic until the seeds germinate. Some seedstarting systems, such as the APS
 have a plastic cover to help retain moisture.
As soon as your seeds have sprouted, remove any plastic covering to reduce moisture and humidity levels. Check the soil every day to ensure that it is moist, not wet. Too much moisture will retard root growth and lead to disease problems. Letting the soil dry out a bit between waterings helps prevent molds and fungus from growing on the soil surface.
Your seedlings will be much happier if you water them with room-temperature water rather than ice-cold tap water. If your water supply is chlorinated, fill some plastic jugs or your watering can and let the water sit overnight so the chlorine dissipates. Don't use water that has been through a water softener. The sodium may kill your seedlings. Try to make sure that the moisture reaches the bottom of the growing container so your seedlings will stretch their roots out and create a nice, fat rootball. You might want to fill the sink or a waterproof tray with an inch or two of water and set your containers right in the water. Just be sure to remove them from the water when the soil surface feels fully moist to the touch.
Air and Humidity
Most seedlings like a humidity level of 50 to 70 percent. Higher humidity levels and poor air circulation can lead to fungus growth on the soil surface and disease problems. If the air in your house is very dry, you can keep your seedlings happy by setting them on capillary matting, or in a waterproof tray filled with small stones and a little water. If your plants are in a small room, you may consider running a small fan to keep the air circulating.
Fertilizing
Once your seedlings develop their second set of true leaves, it is time to start feeding them. Young seedlings are very tender and can't tolerate a full dose of fertilizer. Baby them with a half-strength dose until they are three or four weeks old. After that, you should start full-strength fertilizing every week or two. Since your seedlings are growing in a sterile, soilless medium, fertilizing them is absolutely critical. For best results, use an organic fertilizer, such as Plant Health Care
 , which contains trace elements to ensure that seedlings get all the major and minor nutrients.
Thinning and Potting Up
You may need to transplant your seedlings into larger pots if they start to get crowded and it's still too early to put them outdoors. Don't wait until the plants are a tangle of foliage and roots. The less you rip and tear, the better your plants will survive the move. When handling tiny seedlings, grasp them by their leaves or roots. Avoid holding them by their stems, which are fragile and can be easily crushed or bent.
Stems and roots are easier to separate when the soil is dry rather than wet. You can remove a clump of seedlings and separate them as you go, or use a spoon or your fingers to remove individual plants. Most seedlings should be repotted at the same depth or just a little deeper. The exception is tomato seedlings. When transplanting tomatoes, you should remove all but the top few leaves, and bury the rest of the stem. New roots will form along whatever part of the stem is underground. When your seedlings have been repotted, water them well, fertilize them and return them to the grow light or sunny windowsill.
Transplanting
Once the weather has warmed up, you can start "hardening off" your seedlings by gradually exposing them to the great outdoors. They have been pampered with warm temperatures, plenty of light and consistent water. The weather outside is not so kind - especially in the spring!
At least one week before you plan to put your plants into the garden, begin reducing the amount of water and fertilizer you give them. Place your plants outdoors for one hour each day on a protected porch or under the shade of a tree. Gradually increase the amount of time they spend outdoors. Be sure to protect them from too much wind and hot sun.
If at all possible, try to transplant your seedlings on an overcast or drizzly day when the wind is relatively calm. A polyethylene row cover or shade fabric can help ease the transition, and will protect your plants from cats, flea beetles and other threats as well. Be sure that you water well, so the roots establish good soil contact.
What to Feed Your Seedlings
Seaweed/kelp extracts. Kelp's almost magical effect on plants has been well documented. It seems to be especially effective on seedlings, promoting vigor, cold hardiness, and pest and disease resistance. Apply a dilute amount to the soil or foliage several times during seedling development and at transplanting time. Kelp is not considered a fertilizer, because it does not provide any major nutrients. It should always be used in combination with a complete organic fertilizer.
Fish emulsion. An excellent source of trace minerals, as well as micro and macronutrients. It can be smelly, so be cautious about using it indoors. Ideal for young seedlings during their first few weeks in the garden.
Complete fertilizers. These specially formulated blends contain plant nutrients and organic compounds that promote strong root growth and overall vigor. They ensure that your plants get off to a strong start by providing a balanced supply of micro- and macronutrients including the Big Three: nitrogen, phosphorus, and potassium.
Troubleshooting
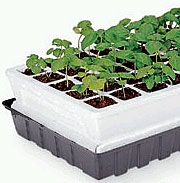 |
Seedstarting systems, such as the APS-40
 , take some of the guesswork out of starting your own seeds. , take some of the guesswork out of starting your own seeds. |
Only one-quarter of my seeds germinated. What went wrong?
There are a number of factors that affect seed germination. Check the seed packet to determine if all the requirements for temperature and light were met. If the soil was cold and excessively wet, the seeds may have rotted. Dig up one of the seeds and examine it. If it is swollen and soft, the seed has rotted and you will need to start over. If the soil was too dry, the seeds may not have germinated or may have dried up before their roots could take hold. Try again and be sure to provide consistent moisture.
My seedlings are spindly. What can I do?
Plants grow tall and leggy when they do not receive enough light. Use grow lights to ensure that they receive 15 to 18 hours of bright light each day. Warm temperatures can also stimulate leggy growth. Try lowering the room temperature and reducing the amount of fertilizer you apply.
The leaves on my tomatoes are starting to look purple along the veins and on the underside of the leaves. What's happening?
Purple leaves are an indication that the plant is not receiving enough phosphorus. If you have been using a dilute fertilizer for the first three to four weeks of the seedling's life, it may be time to increase the fertilizer to full strength. The phosphorus content (the middle number on the fertilizer analysis) should be at least a 3.
Plant Health Care
is especially formulated for seedlings.
My seedlings were growing well until all of a sudden they toppled over at the base. What happened?
When the stems of young seedlings become withered and topple over, they have probably been killed by a soil-borne fungus called "damping off." This fungus is difficult to eradicate once it is present in the soil, but you can avoid it by using a sterile, soilless growing medium
 , and by providing good air circulation. If you see signs of this fungus, transplant the healthy plants out of the container and throw away the diseased plants and soil. Water less and improve the air circulation.
Mold is growing on the top of the soil surface. It doesn't appear to be hurting my plants, but should I be concerned?
Mold is an indication that the growing medium is too wet. It will not harm your plants as long as you take quick action. Withhold water for a few days and try to increase air circulation around the containers by using a small fan. You can also scrape some of the mold off or try transplanting the seedlings into fresh soil.
Resources
Favorite Books
The New Seed-Starter's Handbook by Nancy Bubel (Rodale, 1988).
From Seed to Bloom by Eileen Powell (Garden Way Publishing, 1995).
Burpee Seed Starter: A Guide to Growing Flower, Vegetable, and Herb Seeds Indoors and Outdoors by Maureen Heffernan (Macmillan, 1997).
Park's Success With Seeds by Ann Reilly (Scribner, 1982).